Tutorial Dymo Tape Label
by PCArt


Shown at 20%
File New
3600 x 142 pixels 300 pixels per inch Raster background
this is for the tape
Flood fill with colour of choice
Open Font ARLRDBD
Click on Text tool and choose your font
you will see it as Arial Rounded MT 1 from your dropdown menu
and type your words - Auto Kern Off - Kerning 149
Colour white size 100 as Vector
Object - Align - Center in Canvas
Go to your layers and convert to Raster
SAVE
on your text layer
Selections select all float defloat
selections modify expand x 8 ok
add new layer
fill selections on new layer with tape colour
Select None
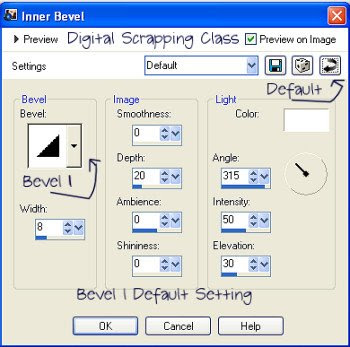
Effects 3d effects inner bevel
Default bevel 1

Adjust blur Gaussian blur 1
Lower opacity of this layer to 50%
on your top white text layer
(if not at the top - move to the top)
effects 3d effects
bevel default bevel 1
change width to 15 and depth to 5
merge visible
cut tape
apply inner bevel
default bevel 1
change width to 2 and depth to 1
save - you are done
xoxoxo pat/PCArt
Looking for Freebies? Click on the Freebie Label to see what is available!
Digital Scrapping Class


1 comment:
Great tutorial, thank you so much.
Post a Comment