Showing posts with label Tutorial. Show all posts

Thursday

Valentine Candy Hearts Tutorial Paintshop Pro


QUICK TUTORIAL

Open a 600 x 600 canvas in Paint Shop Pro 300pixels/inch

Make each candy using the full size of your canvas using preset circle and heart shapes
as shown on background of this image

Choose various candy type colours for the fills.
Arial Font 22 points
Eye Candy Extrude to creat the depth on edges, experiment with settings
Add Noise to create the texture on the candy. 

Save each of your candies in PNG format to add to your projects. 


Sunday

Patterned Paper Tutorial

Patterned Paper Tutorial
by PCArt Creativity
Paintshop Pro

I opened a 600 x 600 pixel 300 pixels per inch canvas
Used my shapes tool to draw out a few coloured butterflies
Applied a texture to the butterflies
Used Simple filter Diamonds to make a seamless pattern.

Opened a 12 inch x 12 inch 300 pixels per inch canvas
Flood filled with white
Used the flood fill tool and selected the butterfly
pattern from the menu at size 200
flood filled my "paper"
merged and saved as .jpg

To Show the sample here
I saved the image again as namepreview
re sized 78 pixels per inch
600 x 600 pixels
smart size
all layers checked
added name to image
and SAVED AS namePreview

Try other patterns, colours, shapes, brushes,
try lowering the opacity or changing the layer options
of your pattern layer before merging and
see what happens!

enjoy!


Stitching in Paintshop Pro Tutorial


TEXT ON PATH use the number 7 to create the stitches around a preset shape on a new layer.

Convert your circle shape to a raster layer and select with the magic wand, go to selections expand x 15 so that the shape fitted the stitches and filled the additional area with  your colour.

Cut your circle of text and then select your circle shape with your wand and paste the stitches into the selection.


Saturday

Beaded Wire Words Tutorial Paintshop Pro


Beaded Wire Words
by PCArt


Find a cursive script font where all the letters join and where the line of the script is even. Or choose any other font you wish. Set to Vector and anti-alias.

Open a new canvas 440 x 160 pixels at 300 pixels per inch transparent

Write your word at about size 30 points or 125 pixels colour white. Convert to Raster.

If it appears too thick for you, go to selections select all, selections float, selections defloat, selections modify, contract x 1, invert and delete. This should make your word lettering appear thinner and more like wire.

Apply effects, texture effects, sculpture with these settings,
Set to default, choose - silver from your pattern drop down list
Size 100, smoothness 48, depth 16, ambience 0, shininess 58,
angle 315, intensity 47, elevation 47, colour #808080
Save as wireword sculpture preset so you can use this setting again in the future.

Apply effects, 3D effects, inner bevel with these settings,
Set to default, choose - Bevel shape 9 (it looks like a curved back to front L),
width 8, smoothness 15, depth 20, ambience 0, shininess 40,
angle 315, intensity 50, elevation 35, colour #c0c0c0
Save as wireword bevel preset so you can use this setting again in the future.

IDEAS - Try painting glitter on to your wire words or use other plug ins like Eye Candy or Super Blade Pro to jazz them up. Make your wires other colours. Or, how about making some lovely doodles and decorating them in this way?!

On A New Layer
Find your bead tubes and place them wherever you want them on your word.

Merge visible and Apply a light drop shadow if you wish.

Mine is saved as .png

Metal Letter Charm Tutorial


Quick Tutorial Note

Font filled with a nice silver gradient and a bevel applied to give it depth.
Add a little ring for hanging if you wish.
Font used in this result Cloister Black - size 80 points or 333 pixels and stretched taller with pick tool
Canvas 1 inch x 1 inch at 300 pixels per inch saved as .png


Text on a Path & Glitter filled shapes


TUTORIAL LINKS

Text on a path reverse text on YouTube PSP X2

Text on a path on a circle on YouTube PSP 9

Glitter Filled Shapes  Tutorial from Shawna

I did this in Paint Shop Pro XI, also played again with the Glitter Fill Tut from Shawna.

Friday

Lucky Trolls Tutorial by C S Green Paintshop Pro


Making these Lucky Trolls was a lot of fun!
Tutorial by C S Green  and they would be a cute addition to a kiddie's scrapbook layout :)
I worked on a 300 pixels per inch Canvas
Hair was drawn with gradient fills
Pen Tool - Freehand - Tracking 70 - Create on vector - Width 1 - Anti-Alias Selected
to make the blue one - then colourized for the green and orange.
xoxoxo pat

Saturday

Leather Look Tag Tutorial Paintshop Pro

Leather-look Jeans Tag
by PCArt


Open New Image 3 inches x 2 inches 300 pixels per inch
fill with colour #c08f5e

Select tag area with magic wand - keep selected and apply effects texture effects fine leather
colour black angle 246 blur 34 transparency 253 number of furrows 59 length of furrows 10 OK

On a New Layer - Pen tool line style dashed width 5 colour #a67c52
Draw a straight line across the top
Convert to Raster and duplicate and flip
Duplicate and rotate 90 left all layers UNchecked
Duplicate and mirror. Use mover tool to move stitches into place.
Merge visible Use selection tool to select and delete stitches at corners
that you do not want. Apply effects drop shadow Horizontal 1 Vertical 1 Opacity 54 Blur 2 Colour Black

On a New Layer apply Brush pattern of your choice in same colour as patch and apply effect 3D effect cut out
Vertical 2 Horizontal 2 Opacity 70 Blur 4 Shadow Colour #6f5137 Fill interior with Colour #c08f5e

On a New Layer - Add Text of your choice in same colour as patch and apply effect 3D effect cutout
Vertical 2 Horizontal 2 Opacity 70 Blur 4 Shadow Colour #6f5137 Fill interior with Colour #c08f5e

On a New Layer - Add Text of your choice in same colour as patch and apply effect 3D effect Bevel
Bevel round Width 1 Smoothness 9 Depth 1 Ambience 0 Shininess 0 Colour white Angle 315 Intensity 50 Elevation 30

Made with Paint Shop Pro XI

Place Mat or Memo board Tutorial Paintshop Pro

Use your imagination to create and decorate your own beautiful Place Mats or memo board!


Open a new canvas in Paintshop Pro 11 inches x 8,5 inches @ 300 pixels per inch.

Use a decorative Brush or Ding to decorate & repeat and rotate to get the different angles down the right side and bottom - then duplicate - mirror and flip to match the other side.

For the centre - Use Preset shape rectangle, no fill, line style dashed, width 7 to create the stitched edges.
Net pattern for the netting.
Heart shape with cut-out for the hearts.
I used a free Dover black and white pattern to create the central design which I coloured and bevelled. Use this  Quick stitch font for the wording.

Print and laminate your design on cardstock.
--------------------------------------------------------------------------------
Or create a Laminated Dry Wipe Memo Board
(Write notes on it with a White Board Marker) From your 8,5 inch x 11 inch layout.


Tuesday

Digital Greeting Card Tutorial Paintshop Pro

Here is an easy tutorial link to make your own A5 size greeting cards to print on card stock

The result to view here is resized to view online.
The original prints perfectly onto a landscape oriented A4 size card stock. 
(when folded in half it would be size A5)


I hope you enjoy making your own cards.

Sunday

Draw a Pencil Paintshop Pro Tutorial

Pencil
by PCArt 01 March 2009


Open New Image
4 inches x 1 inch at 300 pixels per inch

Foreground #afb0ff and Fill #8080ff
Click on fill colour and choose gradient foreground background
Repeat 1 Linear invert Angle 0
the darker shade should be outside and lighter shade inside

Preset Shapes Rectangle
Draw out an oblong shape to represent your pencil shaft

New Layer
Preset shapes Elipse - draw out an elipse to fit the end of your pencil

New Layer - Pencil Point
Preset Shape Triangle draw out a small triangle with your fill colour
Rotate 90 degrees left all layers un checked.
Place in position at the point of your pencil leave a little space for the wood

New Layer - Pencil Wood
Selections Freehand Point to point
draw in your wood and fill with a wood colour and add noise if you wish

Merge Visible

Decorate as you please

Made in Paint Shop Pro XI

Lady Bugs Tutorial Paintshop Pro

LADYBUG

This ladybug was created Using Paint Shop Pro XI


This is only a guide to help you make your own

Effects / Artistic Effects / Balls and Bubbles
I have added my settings to Digital Scrapping Class Folders,
which if you choose to use them need to go in your PRESETS folder.

Head and Eyes - Balls and Bubbles - Preset  AND Body - Balls and Bubbles - Preset
send me an email and I will send you the presets.

Use the deformation tool or Pick tool to make the red ball oval.
Place the black ball below the red one and reduce in size.
duplicate and reduce a lot more for the eyes.
Draw the legs, antennae and dividing line for wings with your pen tool.

Decorate with Hearts with preset shapes.

MANUAL BALLS AND BUBBLES SETTING
SHAPE - Single Ball or Bubble - Maximum size

SURFACE - Black - Opacity 100 - Shininess 75 - Gloss 61

MAPS - nothing selected

ILLUMINATION - Ambience maximum 100 and minimum 22

colour #404040 - Highlight size 59 - back light not checked


The red setting is the same as the black one

the only difference is the Surface colour is red.

Thursday

Digital Scrapbook Element Tutorial Needles


Above is my result of the needles elements made using the following tutorial.

Make some fun needles and threads using this tutorial as a guide

http://pspbuddies.com/pspTutor/CSGreen/needle/needle.html

See Shawna's tutorial to make thread here


Tuesday

Sequins Tutorial using Paintshop Pro

Sequins by PCArt Creativity
Created with Paint Shop Pro XI


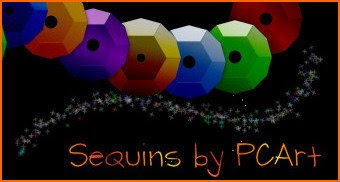
After a number of requests for a tutorial to create digital scrap sequins, I decided to try and figure out a way to make them, this is my result.

1)
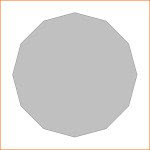
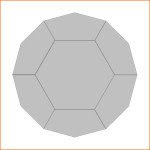
Open a 2 inch x 2 inch Transparent canvas 300 pixels per inch
Click on preset shapes and choose Dodecagon
Line solid width 2 Create as vector and Anti-alias checked
and Retain Style un-checked
On the materials palette foreground colour #808080
background fill colour #c0c0c0
Draw out your Dodecagon whilst holding down your shift key
Objects/Align/Centre in Canvas
Convert to Raster
Save as Sequin .psp image and keep open in your work space.
2)
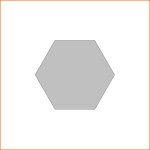
Open another 2 inch x 2 inch Transparent canvas 300 pixels per inch
Go Back to Preset Shapes and with the same settings as before
and holding your shift key down draw out a Hexagon
Objects/Align/Centre in Canvas
Convert to raster
Save as Honeycomb .psp image and keep open in your work space.
3)
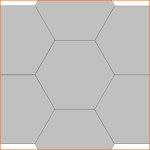
Duplicate Hexagon 6 times and move each to form a honeycomb pattern
Merge Visible
4)
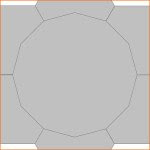
Copy Honeycomb and paste onto the Sequin (Dodecagon) image as a new Layer
Move Honeycomb Layer to bottom and keep visible
5)
Go Back to the Dodecagon layer and click outside the shape with magic wand
expand by 1 pixel
go to down to honeycomb layer and click delete selection to get rid of the outside pieces
Move Honeycomb Layer to the top
Merge Visible
Save
6)
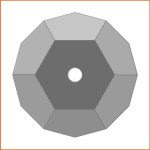
Use the Magic wand to select each area - clockwise - starting from the top one.
Top section - Adjust / Brightness and Contrast / Highlight/Midtone/Shadow / Absolute Adjustment
Shadow 0 Midtone 50 Highlight 100
Second Section change Highlight to 75
Third Section change Highlight to 55
Bottom section change Highlight to 40
Fifth Section change highlight to 50
Sixth Section change highlight to 70
Centre Change Highlight to 0
Cut a small circle out of the middle
Save
7)
Click outside your shape with your magic wand
invert and contract by 1 pixel
Keep selected
Add New layer
Layer Opacity set at BURN - fill selection with a linear gradient
Apply Noise at Gaussian Monochrome 12 if you wish
Merge visible
Re size as you wish.
SAVE as .png