Showing posts with label Layout. Show all posts
Sunday
Scraplifting
SCRAPLIFT
Copy the layout above to create a Scraplift Layout of your choice, using your own elements and images or if you use items from someone else - please credit them as I have done below.
Pressed flowers from Dozibaer - Her link is on the side bar
I "trace-painted" the centre picture of Violets using ART RAGE.
As always if you need help let me know by email.
The rest of the scrapping elements etc, were created in Paintshop Pro.
What is Scraplifting?
Scraplifting: Copying one or more design elements (title, page layout, etc.) from someone's layout and using it for your own scrapbook pages. Fairly common among scrappers, especially when suffering from Scrapper's Block. As the saying goes... "Imitation is the most sincere form of flattery."
Scraplifting Etiquette:
Personally I would not CASE a layout "Copy and Steal Everything"
Better to use a layout as an inspiration and then use your own ideas and scraps to make it your own.
Labels:
Art Rage,
Digital Scrapping,
Layout,
Scraplift
Artist exploration, watercolour, creativity, inspirational, digital graphics, Journal Art, Scrapbooking, design, patterns, seasonal art, fun art,
Layouts using Overlays
Layouts Using Blending Overlays in PSP
I strayed away from the tutorial slightly but had fun just the same
The photo was taken by one of my nephews.
TUTORIAL LINK
I strayed away from the tutorial slightly but had fun just the same
The photo was taken by one of my nephews.
TUTORIAL LINK
Artist exploration, watercolour, creativity, inspirational, digital graphics, Journal Art, Scrapbooking, design, patterns, seasonal art, fun art,
Wednesday
First Layout
First Layout
Note from Pat
First decide which image or photo you want to use in your layout.
Then you can use it as a guide as to the colours and journaling that you want to put into your layout.
Make your layout similar to mine above if you wish.
You could use your own - Glitter Elements from Lesson 36 - Charms from Lesson 4 - and any Ribbons or Papers or other Elements that you have already made yourself!
I am using my poem "A Mother's Love" for the journaling and an image of my Grandmother.
Resized Preview is 600 x 600 pixels at 78 pixels per inch smart size
Labels:
Layout
Artist exploration, watercolour, creativity, inspirational, digital graphics, Journal Art, Scrapbooking, design, patterns, seasonal art, fun art,
Saturday
Patchwork Flower Layout
Tutorial - Patchwork Flower Layout - * 2017 link no longer available
(by Zee Helmick)
Sorry the link is not available but use the image below as inspiration to create a similar layout.
Please share your results in our Facebook group - Art & Digital Art Friends and use this patchwork flower template if you wish.
Ballet Image from Public Domain
(by Zee Helmick)
Sorry the link is not available but use the image below as inspiration to create a similar layout.
Please share your results in our Facebook group - Art & Digital Art Friends and use this patchwork flower template if you wish.
Ballet Image from Public Domain
Artist exploration, watercolour, creativity, inspirational, digital graphics, Journal Art, Scrapbooking, design, patterns, seasonal art, fun art,
Monday
Make a scrap book page
Tutorial - Make a Scrapbook Page
(by Pracken)
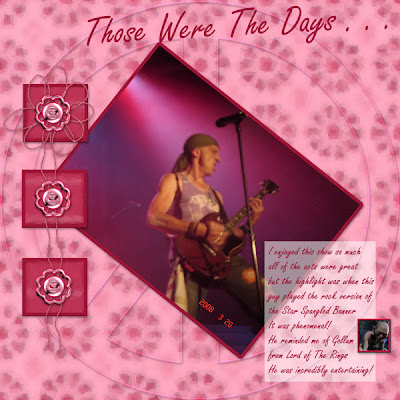
I added the Peace symbol because it is also 50 this year. Click on image to see a larger preview. This image was downsized from 12 inch x 12 inch 300 pixels per inch
to 78 pixels per inch and 600 x 600 pixels - smart size in Paint Shop Pro.
This is an interesting tutorial - which I recommend you to only use as a guide.
It gives you a good example of a simple and elegant well balanced layout.
Do the tutorial exactly as presented if you want to.
By using your own images, elements and colours the result will be uniquely yours!
Use any free elements and tubes if you wish.
Tutorial Notes from pat/PCArt
I created my paper on a 12 inch x 12 inch canvas 300 pixels per inch - and Scribbled a lot with my paint brush set at default / round and size 50 - No two papers will be the same because our scribbles and colour choices are different.
Then I Applied Fantastic Machines Paint Engine - just hit the random button till I saw something I liked. Then I applied Brush Strokes as in the tutorial but used a darker shade of my dark colour. Applied Kaliedoscope at default - Applied Pattern at default - Applied Brush strokes again.
Creating paper like this takes a long time because of the size so you need to be very patient!
The fibres were drawn freestyle on a new layer, then selected and selection expanded by 7 - float - defloat and apply Fantastic Machines to give a fibrous look to them and a drop shadow.
My heading was done in Freestyle Script
set to bold and 90 points, then used the deform tool to rotate it slightly.
My buttons were made using Preset Shapes from Scrap Stuff with PSP
and I applied Effects - Flaming Pear - Laquer to them. Try any other glassy or sculpture effects on yours.
Labels:
Layout
Artist exploration, watercolour, creativity, inspirational, digital graphics, Journal Art, Scrapbooking, design, patterns, seasonal art, fun art,
Tuesday
Your first digital scrap layout
Tutorial - Creating Your First Computer Layout
(Paul Mutton 2001-2006)
Note
If you want to print your layout, then you will want to try and achieve at least 300dpi (dots per inch).
This means your layout will have be at least 3600 x 3600 pixels in size to print out a 12 inch square layout. You may need a lot of memory for images of this size, so be warned!
Labels:
Layout
Artist exploration, watercolour, creativity, inspirational, digital graphics, Journal Art, Scrapbooking, design, patterns, seasonal art, fun art,
Wednesday
Vinyl LP FREE Vinyl Record PNG
I created this layout using a Vinyl LP which I created in Paint Shop Pro - I used used reflection effects/feedback and then layer blends and Greg's pool shadow - it finally worked for me.
If you would like the FREE PNG of the Vinyl Record,
Please email me to request it.
Labels:
Free,
Layout,
PNG,
Vinyl LP Record
Artist exploration, watercolour, creativity, inspirational, digital graphics, Journal Art, Scrapbooking, design, patterns, seasonal art, fun art,
Subscribe to:
Posts (Atom)