Tuesday

Digital Greeting Card Tutorial Paintshop Pro

Here is an easy tutorial link to make your own A5 size greeting cards to print on card stock

The result to view here is resized to view online.
The original prints perfectly onto a landscape oriented A4 size card stock. 
(when folded in half it would be size A5)


I hope you enjoy making your own cards.

Journal Art Words PNG Freebie


Available on A4 size ready print and cut out to paste in your journal.

Message me for the PNG Freebie. 

Saturday

Love Yourself First.


Post Card Template Scrap Freebie PNG

Message me to request this FREE POSTCARD TEMPLATE. 
Click on image to see a larger image.
The template is blank and transparent in PNG Format. 
TOU. You may do as you please with this template.

Thursday

Creativity is Intelligence Having Fun

Easy Graphic made in Canva

I discovered Canva.  

Creating a new graphic, poster, vision board, Facebook post like a birthday greeting, whatever you like!  Canva is fun and free to use online. 

You can sign in with your Facebook account and create instant graphics for any purpose. Quickly and from anywhere. 

Once you have created your graphic you download it and it is ready to print or post. Give it a try. 

The above graphic was made in minutes. 

This is your opportunity to use your own original graphics wherever you wish. 

Tuesday

Free Flower template PNG to use in PaintShop Pro


Above and below are samples of the flowers you could make using my template. 


Message me to request your FREE flower templates in PNG format to use as you wish. 


Monday

Voyage of Art

I am self taught, and as with any craft, experimenting and learning go hand in hand. 

Have the courage to try and you can accomplish almost anything. 

I enjoy drawing and painting and to be honest, over the many years of my lifetime, I wish I had dedicated more time to art. As with many people, real life of work and paying bills and raising your family, will always be foremost in priorities. Sometimes being creative was simply put away on the back burner for far too long. 


The voyage of art can be so satisfying. This voyage can be one of self discovery, it can be a voyage where we are able to block out the negative vibes in the world and to calm our minds. Art can be a form of therapy or a form of relaxation and meditation or an expression of opinion and imagination. 

Many people would say, "I cannot draw or paint, I wish I could." 

Art is not only using pencils, pens, charcoal and paint. Art can be any form of creativity and made from many materials, using a variety of mediums.

Digital art is something I enjoy and am by no means an expert. It is a hobby to me. I am under no pressure to produce anything at any given time. I create for the enjoyment, on the spur of the moment, when I feel like it.  

For digital Art, I use PaintShop Pro, it is used by many for Photo Editing. I only use it to create graphics as I am not a photographer. I have been using this program since 2002 with the Anniversary Edition 7 which I received as a gift from my husband. 

At the time I was keen to learn use it because I had no art materials and no space for creating art in the traditional ways. This program gave me the freedom to create anytime I wanted to and there was no cleaning up afterwards. Since then PaintShop Pro was taken over by Coral and has gone through various updates all the way up to the current 2020 edition that I am using. 

Originally I started to learn how to use PaintShop Pro in a Yahoo Group PSPMadeEz, it was an enjoyable time in my life and the members were wonderful in encouraging one another. There were weekly challenges and lessons.

Now there are groups on Facebook that are dedicated to PaintShop Pro and Photoshop, again there are members with similar interests and lots of inspiration and encouragement within those groups. 

I have gone through a lot of creative stages, making signature tags, writing tutorials (some featured in this blog) in the earlier days. Creating digital scraps for Digital Scrap Books. I have used it to create birthday cards and posters for events at work. I have followed many written tutorials, still available online. 

I used the PaintShop Pro to create Wedding invitations for my daughters. I was so proud that they asked me to do this. 

Recently I have been dabbling in Scrap Journal Art and painting with water colours. Both of these mediums are very new to me. I have been visiting Youtube for examples of how to do this. Even more recently I discovered Canva which is an amazing free online tool that you can use anywhere you can connect to the internet. With the templates available, you can create a graphic item within minutes. 

Art is a creative activity that expresses imaginative or technical skill. It produces a product, an object. Art is a diverse range of human activities in creating visual, performing artifacts, and expressing the author's imaginative mind. The product of art is called a work of art, for others to experience


Saturday

Recycled Junk Journal Page Tutorial on BUDGET


This is my result following a tutorial from here from Maremis on Youtube

I am using an old readers digest book for a junk journal. 


Friday

Pink is for October

The History of the Pink Ribbon 

Halloween Witch

Halloween WitchDrawn freehand in PaintShopPro and Wacom tablet. 
Clothing shaded using Mura Meister's Clouds. 
Use the warp brush to make the curves at the bottom of the cape. 

Sunday

All about the heart font


All about the Heart Font

Create a Valentine Tag or Card with Word Art


Use  KR All about the heart https://www.1001fonts.com/kr-all-about-the-heart-font.html - Free for Personal for your chosen heart design.

Share your results at  Digital Friends on Facebook

Scraplifting


SCRAPLIFT

Copy the layout above to create a Scraplift Layout of your choice, using your own elements and images or if you use items from someone else - please credit them as I have done below.

Pressed flowers from Dozibaer - Her link is on the side bar

I "trace-painted" the centre picture of Violets using ART RAGE.

As always if you need help let me know by email.

The rest of the scrapping elements etc, were created in Paintshop Pro.

What is Scraplifting?
Scraplifting: Copying one or more design elements (title, page layout, etc.) from someone's layout and using it for your own scrapbook pages. Fairly common among scrappers, especially when suffering from Scrapper's Block. As the saying goes... "Imitation is the most sincere form of flattery."

Scraplifting Etiquette:
Personally I would not CASE a layout "Copy and Steal Everything"
Better to use a layout as an inspiration and then use your own ideas and scraps to make it your own.


Layouts using Overlays

Layouts Using Blending Overlays in PSP


I strayed away from the tutorial slightly but had fun just the same
The photo was taken by one of my nephews.

TUTORIAL LINK

Knitted Hedgehog

Knitted Hedgehog


The hedgehog was created from a tutorial which appears to no longer be available.

Use the knit stitch fill pattern to fill the shape of the hedgehog, then colourise.

Use the WARP tool to expand on the tummy and face and animal fur generator brush for the fur


Draw a Pencil Paintshop Pro Tutorial

Pencil
by PCArt 01 March 2009


Open New Image
4 inches x 1 inch at 300 pixels per inch

Foreground #afb0ff and Fill #8080ff
Click on fill colour and choose gradient foreground background
Repeat 1 Linear invert Angle 0
the darker shade should be outside and lighter shade inside

Preset Shapes Rectangle
Draw out an oblong shape to represent your pencil shaft

New Layer
Preset shapes Elipse - draw out an elipse to fit the end of your pencil

New Layer - Pencil Point
Preset Shape Triangle draw out a small triangle with your fill colour
Rotate 90 degrees left all layers un checked.
Place in position at the point of your pencil leave a little space for the wood

New Layer - Pencil Wood
Selections Freehand Point to point
draw in your wood and fill with a wood colour and add noise if you wish

Merge Visible

Decorate as you please

Made in Paint Shop Pro XI

Roses


Drawing a gradient Rose in Paint Shop Pro XI
by PCArt 04 June 2009

Open a New Image 600 pixels x 600 pixels at 300 pixels per inch

To start off..........
Set your foreground colour to #fdb9bb
Set your background to #8a191b

Set your Gradient to Sunburst
Center point Horizontal 78
Center Point Vertical 41
Focal Point Horizontal 27
Focal Point Vertical 76

Using your pen tool Freehand
Tracking 82
Anti Alias checked
Line Width 0
Connect segments checked
Create on Vector checked

Draw irregular shaped (circles?)
decreasing in size each on a new layer
and going to your gradient and inverting
and un inverting on each alternate layer
Then add a shadow beneath each "petal" layer

Expirement with other colours and gradient positions - and see what you can create.
Try adjusting the brightness and contrast on a few layers too.
Add more definition and depth by using your lighten/darken tool on the petals.

You have a Rose!

Lady Bugs Tutorial Paintshop Pro

LADYBUG

This ladybug was created Using Paint Shop Pro XI


This is only a guide to help you make your own

Effects / Artistic Effects / Balls and Bubbles
I have added my settings to Digital Scrapping Class Folders,
which if you choose to use them need to go in your PRESETS folder.

Head and Eyes - Balls and Bubbles - Preset  AND Body - Balls and Bubbles - Preset
send me an email and I will send you the presets.

Use the deformation tool or Pick tool to make the red ball oval.
Place the black ball below the red one and reduce in size.
duplicate and reduce a lot more for the eyes.
Draw the legs, antennae and dividing line for wings with your pen tool.

Decorate with Hearts with preset shapes.

MANUAL BALLS AND BUBBLES SETTING
SHAPE - Single Ball or Bubble - Maximum size

SURFACE - Black - Opacity 100 - Shininess 75 - Gloss 61

MAPS - nothing selected

ILLUMINATION - Ambience maximum 100 and minimum 22

colour #404040 - Highlight size 59 - back light not checked


The red setting is the same as the black one

the only difference is the Surface colour is red.

Font fun

Using the Font Aierbazzi
by Roberto Cecchi


Find Aierbazzi.ttf at this link
https://www.dafont.com/aierbazzi.font

Create your own masterpiece, it can be a tag, or paper, or "painting", a tree, bouquet, accent, underwater scene, jungle scene, fantasy, grunge, overlay, picture frame or anything you want. There is a different image for each letter of the alphabet, you will need to increase your font size to at least 200 points or 800 pixels to get the sizes above. The owl is from AEZ Owls for Traci also available at dafont.com.

Please feel free to show off your results at Art & Digital Art Friends on Facebook 😁😁😁

Enjoy!
xoxoxo pat/PCArt

Diploma Seal

Diploma Seal
by PCArt


Open New Image 800 x 800 pixels at 300 pixels per inch

Preset Shape Starburst

Fill Colour of your choice I used #9f2123
Effects 3D effects Inner bevel
Bevel round Width 2 Smoothness 9 Depth 2 Ambience 0 Shininess 0 Colour white Angle 315 Intensity 50 Elevation 30

New Layer - Preset Shape Circle Fill Colour of your choice I used #9f2123
Effects 3D effects Inner Bevel
Bevel round Width 2 Smoothness 9 Depth 2 Ambience 0 Shininess 0 Colour white Angle 315 Intensity 50 Elevation 30
Click on circle with magic wand, effects plugins and use Gregs Pool Shadow
Settings - Diagonal 55 Centre 113 Horizontal 39 Diagonal 50 Horizontal 30 Vertical 60 Intensity 9 Lightness 127 OK

New Layer - Add wording and detail of your choice - same colour as seal
Apply Inner Bevel as before.

Add Ribbon of your choice

Made in Paint Shop Pro XI

If I can help let me know 

Decorated Tags

Decorated Tags


Using preset shapes and different pattern fills, textures, your own artwork, you can create all kinds of beautifully decorated tags or labels for your scrapping creations.

These can also be made to artfully decorate gifts.

Tags are handy additions to scrap pages and are useful for writing your journaling or information on your layouts.

How you decorate your tags is up to you!

Your tags can be the traditional packaging tag shapes, or circular, heart shapes, any shape, torn, whatever you like!

Decorate your tags with ribbons, buttons or beads, stitching, flowers, leaves or abstract designs, word art, or paint them.


Monday

Lockdown 2020

This unusual time has afforded me the opportunity to get back into creating with Paintshop Pro which is something I enjoy. 

Rusty to say the least, it's all coming back to me. With time to spare and enough coffee, I am updating this blog. 

If there is anything you need to help with your creations please email me at the email I have provided and I will get them to you.

Donations gratefully accepted if you think that the work I have done to help you is worthy.

Stay well and safe and enjoy your own creativity! 

Sunday

Envelope Tutorial

Tutorial Link


Tutorial Note

Working on an 8 inch x 8 inch canvas for space
I made the envelope approximately 16cm x 11cm at 300 pixels per inch
applied texture old paper at default setting but changed the size to 300 and depth to 6
Add a slight bevel to the card and envelope
You could use your lighten and darken tool to give a bit more dimension to the edges of the envelope and card
Merge when satisfied and crop to size.
Image shown at 72 pixels per inch and 600 pixels x 600 pixels Smart Size
xoxoxo pat

Monday

Colourful Grunge Paper

Colourful Grunge Paper


Below are the directions:-

Working on a 12" x 12" 300 pixels per inch canvas.
There are 8 different layers in Paintshop Pro and the layers have different Layer Properties from top to bottom. You can also see the different images used.


To change the colouration below:-

Open the merged colourful image and copy to paste as a new image into your workspace.
Close the original colourful image.
Change the image in your workspace to Greyscale
Increase the colour depth to 8 bits.
Apply a pink overlay or color of your choice and adjust the opacity of this layer.
Added the fern and clock face to the sides.


Sunday

Folded Paper Corners or Rolled Edges


Folded corners or edges


Note from Pat

For this example above you will need  two layers of paper or two different colours or patterns.

Follow steps 1 to 4 as shown in the example above - cutting and pasting the pieces onto a new layer each time.

Once everything is in position - (I have used lines to show the pieces up)

Then you can start applying shadows and use the warp tool or warp brush to alter the fold slightly.

Experiment

Take a real piece of paper and fold the corner down and up again and see how it lays.

If it is soft paper or tissue it can stretch slightly it may even curl a bit.

Instead of using negative image to change the colour of your first cut piece, try colorizing it.

See another example tutorial here at Corel.com Tutorials.

Saturday

To Insert Paper Clip

See this tutorial on YouTube


Easy tutorial to follow to make your paper clips hold your tags

Sunday

Colourize Old Photograph

This was a lovely exercise changing a black and white photo to colour.

Colourizing an image.

There are lots of different tutorials about now so do a search if you fancy doing some colourizing yourself.


Violet Margaret (Frederickson) Stevens (1909-1982)


Saturday

Fill a Shape with Text in Paint Shop Pro

Fill a Shape with Text in Paint Shop Pro

How to wrap text inside a shape


With the one above I selected my text when I was done and used the spray gun to paint over the words, it looks kind of grungy now.


With this one I played a bit longer to get the text positioned exactly as I wanted it in the heart and then played with what I have learned from 36 Glitter Elements and this Cardboard Tag (Video) tutorial, and the vellum tip from J. below.

You will need Mura Meister Clouds available here

1. Start with a blank transparent canvas, size up to you.

2. Set your foreground color to black and background color to white.

3. Go to Mura Meister Clouds under your filter directory and just apply the default settings.


4. Apply a gaussian blur of around 50.

5. Then adjust the opacity to around 22 or whatever looks good to you and voila, vellum. You can even add a poolshadow if you wish. J.

Patterned Beads and Seed Beads

Patterned Beads and Seed Beads
(by ©PCArt)
Using Paint Shop Pro XI


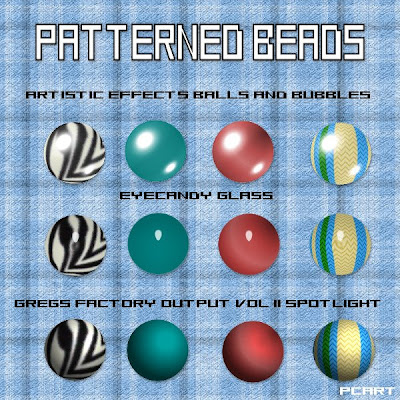
Beads here done with pattern, colour, gradient and pattern again

You need the pattern fills you want for your beads open in your workspace
so that they will be available in your materials palette.
or you can use what you already have in your materials palette
You can use colours, gradients or patterns.

Open a new Canvas 600 x 600 pixels at 300 pixels per inch
transparent background
Background colour fill set at #c0c0c0 - Foreground none
Using your Preset Shapes draw out a circle to the size you want
Keep in mind that the size you see in Paint Shop Pro
when seen at approximately 20% magnification
is about the size it would be when printed

This will be your bead Template

in Paint Shop Pro (or e-mail or web) at 100%


Approximate printed size

Go to your bead layer, Right click and Duplicate your Bead as many times as you want to. Use your mover tool to move the beads to where you want them.
The beads are all on separate layers

Click on your first Bead
Selections / Select All / Selections / Float / Selections / Defloat
Selections / Modify / Expand by 2 pixels
Flood fill with your desired pattern, colour or gradient
Keep Selected
Apply Effects /Geometric Effects / Spherize at default
Keep selected
Apply Effects / Artistic Effects / Balls and Bubbles
Shape - single ball or bubble
Surface - colour #ffffff Opacity 15 Shininess 50 Gloss 80
Maps - none
Illumination - Maximum 15 minimum 0 Lights 1 colour #ffffff highlight size 28 Save preset
OR Apply the Eye Candy Round Glass setting of your choice
OR Apply Effects /Geometric Effects / Spherize at default
and Apply Greg's Factory Output Volume II / Spotlight
Play with the settings until you have something you like
The settings here are
X 164 Y 89 Size 46 Focus 84
Inner Gain 160 Outer Gain 45

Repeat applying patterns or colours or gradients and effects to your collection of beads. Cut and paste each completed bead as a NEW IMAGE and save as .png

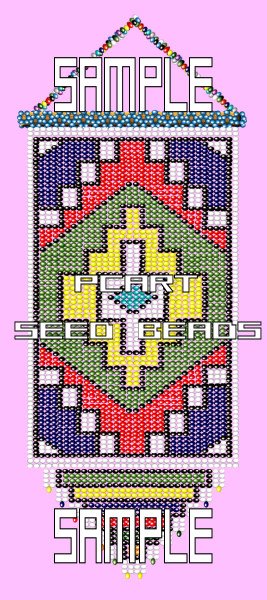
Continuing with this phase of beads that we are in and using any of the previous tutorials for beads


Create some bead work - anything at all - I used my Seed Beads in some way in all of my Africa Theme Kits This is one of the things I have made with my Seed Beads

Thursday

Definition Tag

Originally from a tutorial By Angela M. Cable - the tutorial is no longer available


Tutorial Note from Pat


Card size 1004 x 650 pixels at 300 pixels per inch
Flood fill with colour of choice
Apply texture I used Filters Unlimited / Cardboard fine
Paint Brush size 47 - blur 32
Add your choice of message /definition / with your favorite font
Leave off the drop shadow
Apply a slight inner bevel to the card.


Guitar from a template


I created this guitar from the Layered Guitar Templates available at the Scrappin Cop

Tuesday

Repair old photo


I am pleased with the way this turned out. I took the old damaged photo of my father and restored it using various retouch tools and layer blends in Paint Shop Pro.
Here is a tutorial link to restore old photo's


Flowers

Scrap kits often have flowers in them, Vector Drawn and hand painted.
Preset shaped flowers are also used and added to doodles, or used to create Patchwork flowers.
Preset Shapes can also be used to make Paper, Cardboard, Tissue, Fabric, Denim, Gingham, Glass, and Faux felt and sticker flowers. Beads and stitching can be added.


How about creating a Flowery Frame or flower textured paper or ribbon?
Filters are applied to make them look like glass or some kind of jewel or charm.
Real flowers are also photographed and then tubed.
Sometimes a texture is added to make them look like fabric.


This is a little inspirational nudge to challenge you to see what kind of flowers you can create.


I am hoping to see many beautiful bouquets! Share them if you want to on our Facebook page!

Thursday

Old Fashioned Slide Mounts


Polaroid Tutorial Link

Polaroid Frame tutorial from Coral Discovery Centre

Note From Pat

If you are making your single slides for a printable scrap page - try making them at least 3.5 inches x 3.5 inches at 300 pixels per inch.

The round one in the middle has no tutorial - it is simply a preset circle, and a circle cut out, a rounded rectangle duplicated and flipped and merged, duplicated and rotated 45 degrees - and repeated to complete the circle of frames to make your own "viewmaster" type of slide. Here is my mini tut on the Viewmaster type slide, I hope it is clear and easy to understand.

Viewmaster


Saturday

Calendar page using a script


Create a Calendar Page
using script from Joske (for personal use only)
be sure to read instructions given at the download link

Tuesday

Valentine Candy Hearts


I made these hearts each on 600 x 600 canvas using Paint Shop Pro
see circle and heart on background of this image
using a preset shape heart
Various candy type colours
Arial Font 22 points
Eye Candy Extrude - experiment with settings
Add Noise

Example Fonts to use - Helvetica, Arial, Futura

Sans-serif fonts

Example messages

Sweethearts are small heart-shaped candies sold around Valentine's Day. Each heart is printed with a message such as "Be Mine", "Kiss Me", "Call Me", and "Miss You". Sweethearts are made by the New England Confectionery Company, or NECCO. A similar type of candy is sold in the UK under the name Love Hearts. NECCO manufactures nearly 8 billion sweethearts a year.
Sweethearts are now available in a variety of assortments to choose from including chocolate, tart, and smoothie flavors.