LADYBUG
This ladybug was created
Using Paint Shop Pro XI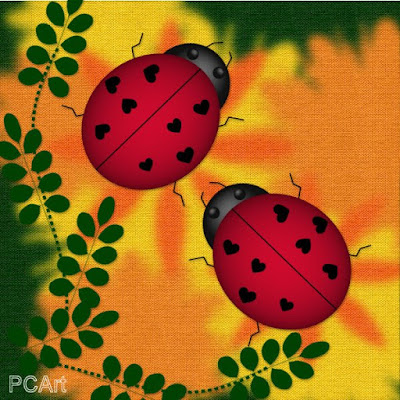
This is only a guide to help you make your own
Effects / Artistic Effects / Balls and Bubbles
I have added my settings to Digital Scrapping Class Folders,
which if you choose to use them need to go in your PRESETS folder.
Head and Eyes - Balls and Bubbles - Preset AND Body - Balls and Bubbles - Preset
send me an email and I will send you the presets.
Use the deformation tool or Pick tool to make the red ball oval.
Place the black ball below the red one and reduce in size.
duplicate and reduce a lot more for the eyes.
Draw the legs, antennae and dividing line for wings with your pen tool.
Decorate with Hearts with preset shapes.
MANUAL BALLS AND BUBBLES SETTING
SHAPE - Single Ball or Bubble - Maximum size
SURFACE - Black - Opacity 100 - Shininess 75 - Gloss 61
MAPS - nothing selected
ILLUMINATION - Ambience maximum 100 and minimum 22
colour #404040 - Highlight size 59 - back light not checked
The red setting is the same as the black one
the only difference is the Surface colour is red.