Showing posts with label Paintshop Pro. Show all posts

Tuesday

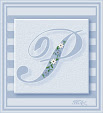
Sequins Tutorial using Paintshop Pro

Sequins by PCArt Creativity
Created with Paint Shop Pro XI
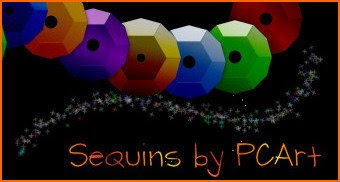

After a number of requests for a tutorial to create digital scrap sequins, I decided to try and figure out a way to make them, this is my result.

1)
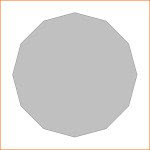
Open a 2 inch x 2 inch Transparent canvas 300 pixels per inch
Click on preset shapes and choose Dodecagon
Line solid width 2 Create as vector and Anti-alias checked
and Retain Style un-checked
On the materials palette foreground colour #808080
background fill colour #c0c0c0
Draw out your Dodecagon whilst holding down your shift key
Objects/Align/Centre in Canvas
Convert to Raster
Save as Sequin .psp image and keep open in your work space.
2)
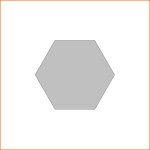
Open another 2 inch x 2 inch Transparent canvas 300 pixels per inch
Go Back to Preset Shapes and with the same settings as before
and holding your shift key down draw out a Hexagon
Objects/Align/Centre in Canvas
Convert to raster
Save as Honeycomb .psp image and keep open in your work space.
3)
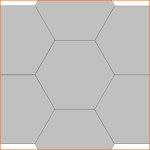
Duplicate Hexagon 6 times and move each to form a honeycomb pattern
Merge Visible
4)
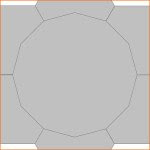
Copy Honeycomb and paste onto the Sequin (Dodecagon) image as a new Layer
Move Honeycomb Layer to bottom and keep visible
5)
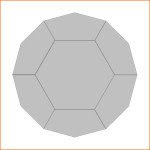
Go Back to the Dodecagon layer and click outside the shape with magic wand
expand by 1 pixel
go to down to honeycomb layer and click delete selection to get rid of the outside pieces
Move Honeycomb Layer to the top
Merge Visible
Save
6)
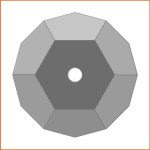
Use the Magic wand to select each area - clockwise - starting from the top one.
Top section - Adjust / Brightness and Contrast / Highlight/Midtone/Shadow / Absolute Adjustment
Shadow 0 Midtone 50 Highlight 100
Second Section change Highlight to 75
Third Section change Highlight to 55
Bottom section change Highlight to 40
Fifth Section change highlight to 50
Sixth Section change highlight to 70
Centre Change Highlight to 0
Cut a small circle out of the middle
Save
7)
Click outside your shape with your magic wand
invert and contract by 1 pixel
Keep selected
Add New layer
Layer Opacity set at BURN - fill selection with a linear gradient
Apply Noise at Gaussian Monochrome 12 if you wish
Merge visible
Re size as you wish.
SAVE as .png
Wednesday

Text on a path

Text on a Path

https://scrapbookcampus.com/2016/07/text-on-path-in-paintshop-pro/


Tutorial Note from Pat
If your text is not moving along your line enough, add spacing at the beginning to push it along the curve.


Tuesday

Metal Charm Elements

Metal Charm Elements

Creating a Metal Charm (by Bruticia) * 2017 - tutorial link no longer available - see my notes below.


Notes from Pat

Try different shapes, and sizes - also test different line widths from 5 to 10, try adding gems or other decoration.

Save the finished charms in .png format like the heart above. Eventually try different sculptures and metal or other effects.

......Go to Effects~Texture Effects~Sculpture
Presets~Gold and click ok......
This is the plain gold that should be available and should be visible in your Sculpture pattern window.

If you do not have it then save this Gold.bmp to your Paint Shop Pro pattern folder.

When you click on Presets - and your Sculpture options box pops up
click on the bent back arrow to restore to default
then click on the menu arrow there and scroll down to find Gold and accept the settings. OK

The Gold default settings should be
Size 100 Smoothness 10 Depth 3 Ambience 0 Shininess 46
Angle 315 Intensity 30 Elevation 56 Colour White

When creating your charm for some shapes you might want to make your line width thinner or thicker - it also depends on how large your charm is.

Also where the dark colour is - the sculpture goes inward and where the light colour is the sculpture comes outward.


The thing with scrapping is you can make the same or similar things over and over again for use in different layouts and themes - so let your imaginations run wild.

Find New Shapes at Scrap Stuff With PSP while they are still available!

Monday

Make your own Brads

Make Your Own Brads

Using the skills you have already acquired, open a new image and then using shapes - circle, select and while selected fill with patterns and use image effects kaleidoscope to create amazing patterns. Apply a slight bevel to the edge and there you have a lovely brad!  Save as a .png image to place on your scrapping pages.


Thursday

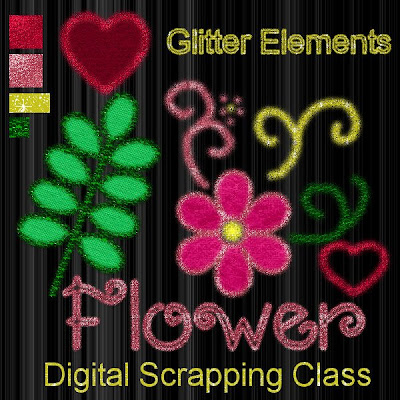
Glitter Elements

Tutorial - Creating Glitter Elements - 2017 the link no longer works - see notes below.
(by Tracey Renemo)

Thanks to the wonderfully talented and generous teachers who share their talent and tutorials, I am continually learning!

Right click on this image and open in a new window to see a larger preview of the glitter.

The link given in tutorial for glitter does not work - use any glitter you have or use the ones I have here


you can also re-colour them and save them as a new colour .jpg

Things to do to set up for your Glitter Elements, you need the vector paint script.
it is not as complicated as you may first think it is! 
Unzip your Paint script and place it in your Scripts Restricted Folder.

Briefly it is this easy to do.
1 - Download Script - unzip and place your script in the correct folder.
2 - Find a glitter to use and open in your work space to view in your materials patterns palette.
3 - Open new canvas
4 - Set up your paint brush settings as set out below (save as your own preset)
5 - Choose your preset shape, or lettering, and place on your canvas. (as Vector)
6 - Run your script - File/Script/Run and choose Vector Paint Script and see what happens
7 - Keep on experimenting! Adjust your brush size and try again.

I have icluded the Glitters that I used.
You could also just paint your glitter on like doodles by hand with your paint brush.

Read through the tutorial carefully - then read my notes.

(I do not have the coloured noise brush)
Click on your Paint Brush and set to default
(click brush presets and click on bent back arrow to get to default)
Paint Brush Settings.
Round - size 17 - hardness 4 - step 35 -density 70
thickness 100 - rotation 0 - opacity 100 - blend mode normal
continuous unchecked - wet look paint unchecked.
Click View/Palettes/Brush Variance
all settings on 0 except Fade 100 - position jitter 5 - impressions per step 1
Open your choice of glitter pattern in your Paint Shop Pro work space.
Any open image in your workspace can be viewed in your Materials/patterns palette.
Save Brush Preset. Click on Brush Preset and then on the save disk image give your preset a name.

As you can see on my preview some glitter is smaller, just go to brush - change your size and then go back to run your script - use the undo button if you need to.
The script can only be run on the vector layer while it is a vector.
I use Paint Shop Pro XI - I can type text and then under the objects button - convert to path - I can then run the script on lettering too. However, if you are unable to do this you can select your text and float/defloat expand selection and paint your glitter by hand into your selection.

Email me for help if needed. See side bar.


Saturday

Create a Vase in Paintshop Pro


Create a Vase - © PCArt 11 September 2004

This Tutorial is my own creation.   Please do not copy it or claim it as your own. I hope you enjoy doing the tutorial, your creation is yours to do with as you please. If you would like to share this tutorial through a group or to a friend Please supply only a text link to it. 

What you will need 
Paintshop Pro (this was done with 9 Trial version)
(it can probably be done with ease using other versions of Paintshop Pro)
Flower tubes of your choice
~~~~~~~~~~~~~~~~~

1) Open New Image 400 x 600 pixels Transparent background
Remember to Save Often

2) Make Foreground white and background Null in colour palette

3) Go to Preset shapes select ellipse / mode circle / create on vector / line width 1 / Anti-alias
Draw a circle about one third of the size of your canvas, use your mover tool to move the circle down towards the bottom of your canvas, go to Objects / Align / Horizontal in canvas
Right Click on your vector layer in your layer palette and convert to Raster layer

4) Use the Magic Wand to click in the middle of the circle and now you have marching ants where your line is - Keep Selected and Add a New Raster Layer
Effects / 3D Effects / Cut-out / with these settings
Vertical 8 Horizontal -6 Opacity 48 Blur 20 Fill interior with colour unchecked

5)Keep Selected and Add a New Raster Layer
Effects / 3D Effects / Cut-out / with these settings
Vertical -13 Horizontal 11 Opacity 40 Blur 30 Fill interior with colour unchecked

You now have four layers
your base layer with nothing on it
your second layer with the white circle edge
your third and fourth layers with the individual cut-outs

6) Click on the eye in layer palette on layer one and two to make them invisible
Right Click on layer three or four and Merge / Merge Visible

7) Click in centre of white circle on layer two with your magic wand
Add a new Raster Layer!
Using your Flood Fill Tool (The bucket)
Flood Fill with Ocean Blues Gradient / Style Linear / Angle 182 / Repeats 0 / Invert Checked
Adjust / Add Noise / Uniform / 15
Selections / Select None
You can lower the opacity on this layer to about 90

8) Use your selection tool / rectangle,  to select a small portion of the top part of your filled circle and delete leaving it with a flat top for the neck of the vase
Keep Selected and repeat delete on the Merged Layer to clean the top part of the cut-out
Add a New Raster layer
Use your selection tool to select a rectangle shape at the top of your image to create a top for your vase
Flood fill with white Keep Selected
Flood fill with Metal Brass Gradient / Linear / Angle 90 / Repeats 0
Selections / Select None

9) **Repeat this task (8) **at the bottom of your circle to form the base
SAVE YOUR WORK
Now you can select flower tubes to place in your vase
Now you can delete the white circle layer you don't need it anymore
Fill your base layer as you wish, mine is flood filled with Black
Add your watermark and embellishments or frame and you are done.

I hope that you enjoyed doing it as much as I enjoyed creating it.

I would really appreciate your feedback and seeing your finished result.